Dry Creek Bed for Drainage: Sizing, Slope, Cost, and Mistakes
A dry creek bed is a stone-lined channel that carries surface water while looking like a natural streambed. The ones that work follow the yard's real slope, have a genuine water source and a lower outlet, and are built on fabric and gravel. Built for looks alone, in a spot with no water path, it just decorates a place that stays wet.
The one drainage fix people actually want
Most drainage solutions are things homeowners tolerate. A dry creek bed is the exception — it is the one people seek out, because done well it turns a drainage problem into a feature that looks like it belongs. That popularity is also its biggest trap: many dry creek beds are built as decoration first and drainage never, then blamed for not working when they were never designed to.
The difference between a dry creek bed that drains and one that just sits there is not the rocks. It is whether it was built around where water actually goes.
Functional first, pretty second
A dry creek bed — also called a dry river bed or dry stream bed — is, underneath the stone, a swale — a graded surface channel — dressed to look like a natural streambed. Everything that makes a swale work makes a dry creek bed work, and the aesthetic sits on top of that, not instead of it.
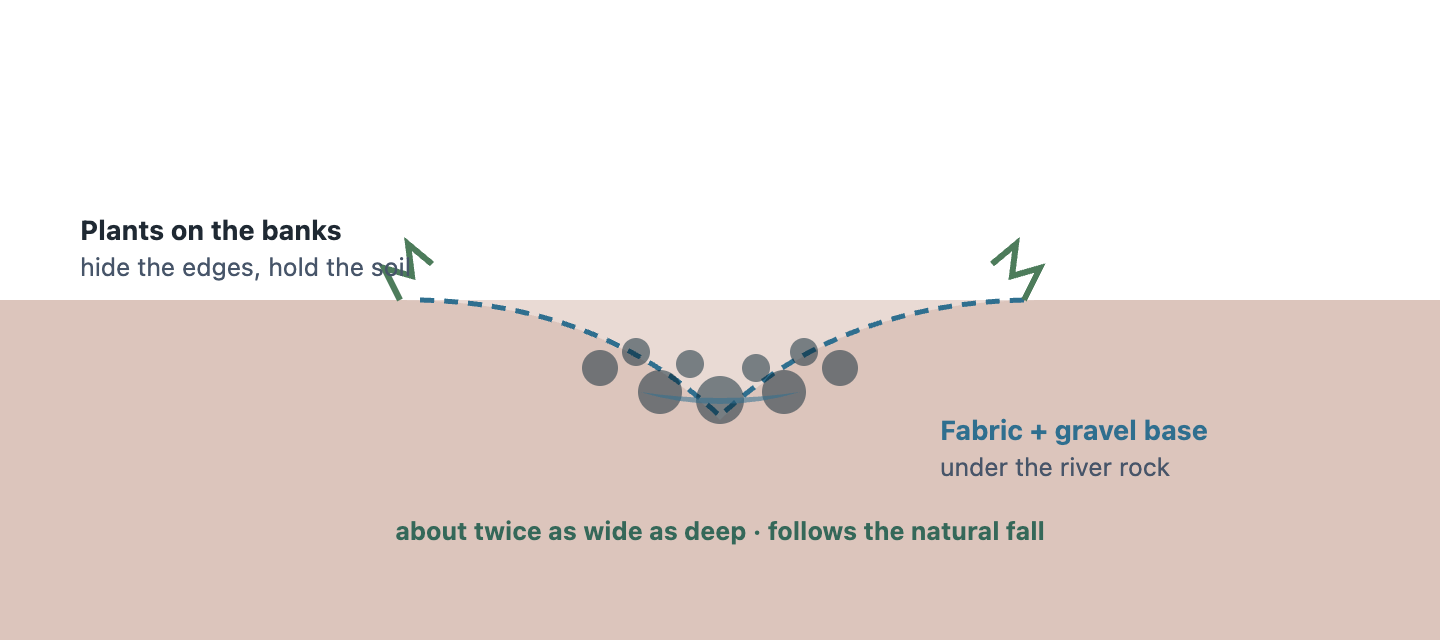
Four things separate a working dry creek bed from expensive landscaping:
- A real water source. It has to sit where water actually arrives — the path runoff already takes, a downspout outlet, the bottom of a slope. A creek bed in a dry corner drains nothing because nothing reaches it.
- Genuine fall to a real outlet. Water moves by gravity. The bed follows the yard's natural slope to somewhere lower and welcome — a rain garden, a ditch, a daylight edge — never toward the house, the street, or a neighbour.
- Fabric and a gravel base under the pretty rock. Landscape fabric keeps soil from pumping up into the stone, and a gravel base gives water a path and keeps the bed stable. Skip these and it silts in and stops moving water within a couple of seasons.
- The right proportions. Roughly twice as wide as it is deep, with gentle curves that follow the land. Straight, narrow, and deep reads as a ditch and scours.
Get those right and the aesthetic — varied river rock, a few boulders, plants along the banks, maybe a log or a stepping stone — is the easy part.
Watch the dry creek bed walkthrough
This video shows the same idea visually: a dry creek bed only helps drainage when it follows the water's real path, has enough fall, and sends runoff to a safe lower place.
And this short covers the single mistake that turns a dry creek bed into a decorative mud puddle — building the rock channel without a real drainage path.
When a dry creek bed is the right choice
Good fits:
- Surface water running across the yard along a visible path
- A downspout or swale that needs a finished, attractive outlet
- Erosion channels you want to stabilise and beautify at once — see yard erosion
- Directing water toward a rain garden or dry well
- Anywhere you'd rather have a landscape feature than visible drainage hardware
Poor fits:
- Saturated soil with nothing flowing on the surface — that is a French drain problem below ground.
- Dead-flat ground with no outlet — no fall means no flow, and the bed becomes a rock- filled puddle.
- A pinpoint low spot — a catch basin is simpler and smaller.
Quick sizing guide
Dry creek beds should be wide and shallow, not narrow and trench-like. Use this as a planning starting point, then size up when a larger roof area, steep slope, or frequent heavy runoff feeds the bed.
| Situation | Planning size | What to watch |
|---|---|---|
| One downspout or small garden edge | 18–24 inches wide, 6–8 inches deep | Make the inlet clean so water enters the bed instead of cutting around it |
| Visible surface flow across a lawn | 2–3 feet wide, 8–12 inches deep | Keep gentle curves and check that the whole route falls toward the outlet |
| Erosion channel or heavier slope runoff | 3–4 feet wide or more, 12–18 inches deep | Use larger stone at bends, inlets, and outlets so faster water does not scour |
| Flat yard with no lower outlet | Usually not a dry creek bed problem | Look at a rain garden, dry well, catch basin, or regrading instead |
For slope, the practical goal is simple: water should keep moving all the way to the outlet. A 1% fall is a useful minimum planning target — about 1 inch of drop every 8 feet. A steeper run can work, but it needs more stone size and more outlet protection because fast water moves rock and soil.
Inlet and outlet: the part that decides whether it works
The inlet is where water enters the creek bed. That might be the end of a downspout extension, the bottom of a small slope, or the place where runoff already cuts a shallow path through the lawn. Make the inlet obvious and stable: a short solid pipe from a downspout, a small splash area of larger stone, or a widened start to the channel all help water enter the bed instead of washing around it.
The outlet matters even more. A dry creek bed should drain to a lower place that can accept water without creating a new problem:
- A rain garden or planted absorption area
- A dry well, if the soil can absorb water
- A daylight edge on a slope
- An existing ditch or approved drainage route
- A larger swale that continues the flow away from the problem area
Do not aim the outlet at the foundation, a neighbouring property, the street, or a place where water will simply pool again. If the only available outlet is questionable, solve that first. The prettiest stone channel in the yard still fails if it sends water to the wrong place.
How to build a dry creek bed
- Watch where water goes in a real rain, and pick the path and a lower outlet.
- Call 811 before digging.
- Mark a curving route that follows the natural fall — paint or a hose laid on the ground helps you see it.
- Excavate wide and shallow, commonly 18 inches to 3 feet wide and 6 to 12 inches deep for many residential beds, larger for heavier flows.
- Lay landscape fabric or geotextile up the sides, pinned in place and overlapped at seams so soil cannot pump up into the stone.
- Add a gravel base of clean drain rock, then set larger river rock and a few boulders so the stone looks placed by water, not poured from a bag.
- Armor the inlet, outlet, and bends with larger stone. Those are the places moving water works hardest.
- Hold gentle fall the whole way to the outlet — check with a string line or hose test.
- Plant the banks with things that tolerate occasional wet feet, to soften the edges and hold the soil.
Material planning example
For a 20-foot-long by 3-foot-wide dry creek bed around 10 inches deep, a rough material plan might look like this:
| Layer or material | Planning amount | Why it matters |
|---|---|---|
| Landscape fabric or geotextile | 80–100 square feet | Covers the bottom, sides, overlap, and edges |
| Base drain rock | About 1 cubic yard | Creates the working drainage layer below the visible stone |
| Surface river rock or cobble | About 1–1.5 cubic yards | Forms the visible streambed and protects the channel |
| Larger stones or boulders | 6–12 pieces | Stabilizes bends, inlet, outlet, and visual focal points |
| Edge plants | As needed | Softens the edges and helps hold soil on the banks |
The exact amount changes with depth, curves, rock size, and how much of the channel is filled with larger stone. Order a little extra if the bed has many bends or if you are blending it into existing planting beds.
Mistakes that make dry creek beds fail
| Mistake | What happens | Better approach |
|---|---|---|
| Building where water does not naturally arrive | The bed looks nice but drains nothing | Put it on the runoff path, downspout route, or erosion line |
| No lower outlet | Water stalls in the rock and creates a long puddle | Confirm continuous fall before digging |
| Sending water to the wrong place | The problem moves to the house, street, or neighbour | Choose a rain garden, dry well, daylight edge, ditch, or approved route |
| Making it narrow and deep | It reads as a ditch and can scour in storms | Keep it wide, shallow, and gently curved |
| Using one size of small rock | Stone shifts and the bed looks dumped | Mix base gravel, river rock, cobbles, and larger stones |
| Skipping fabric and base rock | Soil works up into the stone and clogs the bed | Use fabric under a clean gravel base |
| Ignoring the inlet and outlet | Water cuts around the pretty middle | Use larger stone where water enters, exits, and turns |
Not sure this is the right fix?
Check whether your yard needs a dry creek bed, swale, basin, or French drain
A dry creek bed is best for visible surface runoff. If the ground stays soggy with little surface flow, or water collects in one low point, a different fix may be more useful.
What it costs
| Scope | Rough planning range |
|---|---|
| DIY dry creek bed, short run | Materials — often $300 – $800 |
| DIY 20-foot by 3-foot bed | Often $700 – $1,500 in stone, fabric, and plants |
| Professional, per linear foot | $20 – $50 per foot |
| Larger bed with boulders and planting | $1,500 – $5,000+ |
Planning estimates, not quotes. Stone, length, boulder size, and planting drive the number. A dry creek bed usually costs more than a plain grassed swale doing the same drainage job — you are paying for the finished look, which is a fair reason, just not a drainage one.
Related pages
- Swales and berms — the same channel, unfinished and cheaper
- Rain gardens — a natural place for a creek bed to end
- Yard erosion from runoff
- Standing water in your yard
- Compare every yard drainage option
FAQs
Do dry creek beds actually help with drainage?
Yes — when built as a graded channel with a real water source and a lower outlet. A dry creek bed (also called a dry river bed or dry stream bed) is essentially a stone-lined swale, and it moves surface water the same way. Built purely for looks in a spot with no water path or no fall, it does nothing for drainage. The drainage comes from the grade and the outlet, not the rocks.
How deep and wide should a dry creek bed be?
A common residential proportion is about twice as wide as it is deep — often 1 to 2 feet wide and 6 to 12 inches deep, larger for bigger flows. Wide and shallow with gentle curves both carries water better and looks more natural than a narrow, deep trench, which reads as a ditch and tends to scour.
What is the difference between a dry creek bed and a French drain?
A dry creek bed carries water across the surface and is visible by design; a French drain collects water from within saturated soil and is buried. Use a dry creek bed for water running or pooling on top of the ground where you want an attractive result; use a French drain for ground that stays soggy underneath with nothing showing on the surface.
Do you need landscape fabric for a dry creek bed?
Yes, for a bed meant to drain. Landscape fabric under the gravel and stone keeps soil from working up into the rock, which is what silts a creek bed in and stops it moving water. Use a heavy-duty, water-permeable geotextile rather than thin weed-barrier film, which tears under stone, and overlap the seams so soil cannot push through the joins. Skipping fabric is one of the main reasons a good-looking dry creek bed stops draining within a couple of seasons.
What size rocks for a dry creek bed?
Use a mix. A gravel base under the surface, then river rock and cobbles of varied sizes on top, with a few larger boulders placed as if water positioned them. Varied stone looks natural and different sizes lock together and resist washing out. Uniform, single-size rock looks poured and shifts in heavy flow.
Where should a dry creek bed drain to?
Somewhere lower that can accept water: a rain garden, a dry well, a ditch, or a daylight edge on a slope. It must not send water toward the house, into the street, or across a property line, where concentrating flow onto a neighbour can create problems. Establish the outlet before you build the bed.
How much does a dry creek bed cost?
A short DIY bed can be a few hundred dollars in materials. Professional installation commonly runs $20 to $50 per linear foot, and a larger bed with boulders and planting can reach several thousand. It typically costs more than a plain grassed swale doing the same drainage work — the extra buys the finished appearance. These are planning ranges, not quotes.
Sources consulted
By Under Your Home Team · Last reviewed 2026-09-15