How to Install a Channel Drain (Trench Drain), Step by Step
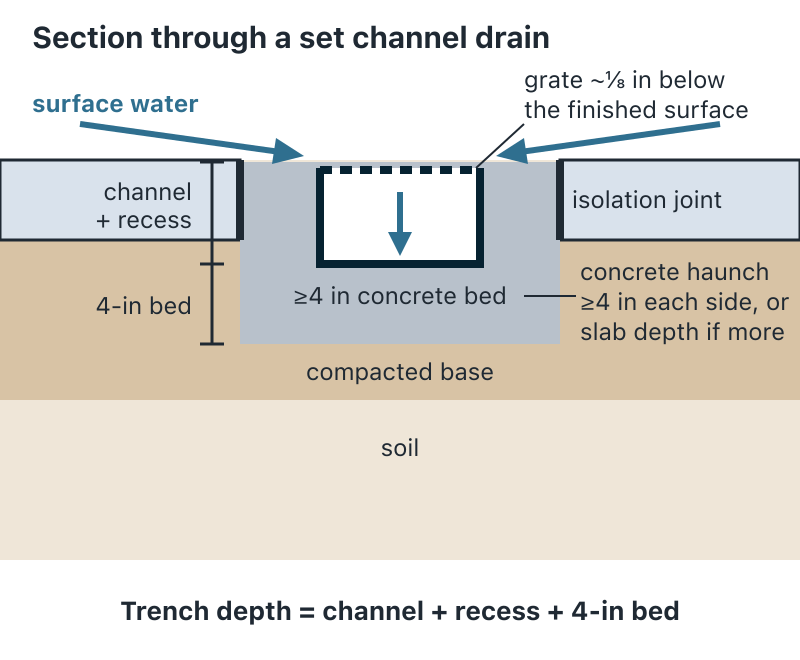
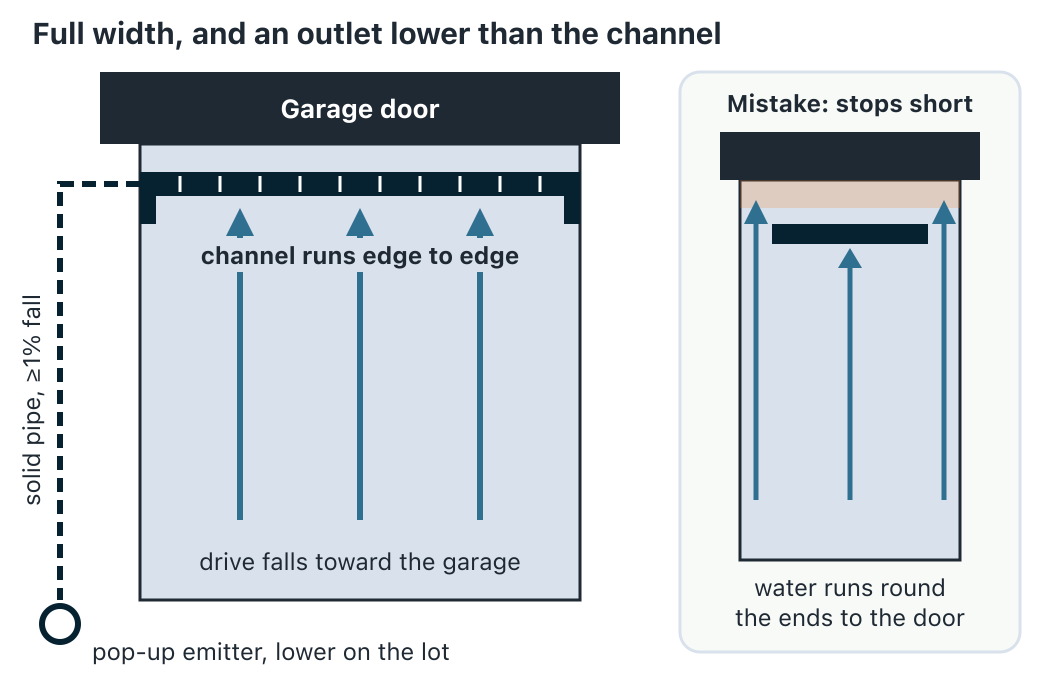
To install a channel drain, first confirm a solid outlet pipe can fall at least 1% to a lower discharge point. Run the channel full width at the low line, set it on a 4-inch concrete bed and haunch, with the grate about 1/8 inch below the surface, then connect solid pipe and test with a hose.
Is a channel drain the right fix?
A channel drain (also called a trench drain) is a grated slot that collects water along a line. Check that the line is really the problem before you cut concrete:
- Water sheets across the full width of a drive or patio toward the house. A channel fits. First confirm whether a channel drain is the right fix for your driveway.
- Water arrives from uphill, not off the paving. Intercept it higher up, often with a swale above the drive.
- Water collects in one low spot. A catch basin is simpler.
- It's a gravel drive. Crown it and give it a shoulder rather than setting a channel in it.
If water is already getting into the garage, see the note near the end of this page.
Plan the fall and the outlet before you cut
Most channel drains that disappoint were set neatly and planned badly. The trench turned out deeper than the slab, or the outlet had nowhere lower to go. Measure these before buying anything:
- The grate line. Mark where the channel will run, full width at the lowest line of the paving, and the end the outlet will leave from.
- The outlet route. Walk the path the solid pipe will take to its discharge point.
- How much lower the discharge point is. Run a level string, or use the yard slope calculator, from the grate line to the discharge point and measure the drop.
The channel needs about 1% fall (⅛ inch per foot), built into pre-sloped sections or set by tilting constant-depth sections. The trench has to hold the channel body, the ⅛-inch recess and a 4-inch concrete bed, which is ACO's minimum for a 4-inch channel under cars. This worksheet uses a channel body 5 inches deep:
| Run | Outlet | Extra fall along the channel | Trench depth, shallow end | Trench depth, low point | Discharge point, after 40 ft of pipe |
|---|---|---|---|---|---|
| 16 ft (one-car apron) | At one end | 2 in | about 9 in | about 11 in | about 12 in below the grate |
| 16 ft (one-car apron) | In the centre | 1 in | about 9 in | about 10 in | about 11 in below the grate |
| 20 ft (two-car apron) | At one end | 2½ in | about 9 in | about 11½ in | about 12½ in below the grate |
| 20 ft (two-car apron) | In the centre | 1¼ in | about 9 in | about 10½ in | about 11½ in below the grate |
The last column adds the outlet pipe's own fall: another 1¼ inches for every 10 feet, so 5 inches over a 40-foot run. A centre outlet halves the fall inside the channel, but the pipe then has to leave from the middle of the drive. A pre-sloped system changes where the fall sits, not how far down the discharge point must be.
The go/no-go line: if the lowest point you can reach on your lot isn't at least that far below the grate, a deeper channel won't help. The answer is a pop-up emitter on gently falling lawn, or storage in a dry well.
Tool
Measure the fall to your outlet
Enter the drop and the distance from the grate line to the discharge point. The calculator shows the percentage and whether it clears the 1% minimum.
Cut into existing concrete, or set it in a new pour?
| Cut into existing concrete | Set in a new pour | |
|---|---|---|
| Slab vs trench | A 4–5 in slab over a 9–12 in trench means removing the slab and digging base | The channel is set first and the slab poured to it |
| Cut width | Channel width + about 4 in each side for the concrete surround | Formed to the same surround |
| Joints | Isolation joints between the new haunch and the old slab | Transverse joints at the channel joints, as in any pour |
| Where to cut | Along an existing control joint or the apron edge if it's on the low line; mid-slab only if it isn't | Anywhere the fall plan puts it |
| Planning cost, installed | $70–$150 per foot | $30–$80 per foot |
Cutting in costs roughly twice as much because of saw-cutting, breaking out and re-pouring, and the finish rarely matches. If the apron is cracked or due for replacement anyway, fold the channel into the new pour.
Pavers and asphalt. In pavers, the channel is bedded and haunched in concrete, and the first course of pavers against it is re-laid and bonded to the haunch so it can't creep. ACO calls for a full concrete surround in pavers above Class B, and in asphalt above Class C. Patio installs follow the same logic, covered in patio and hardscape drainage.
Choose the channel and a grate rated for what crosses it
Grates and channels are rated by load class under the European standard EN 1433. Many US products print a manufacturer class instead, so match the spec-sheet rating to the traffic:
| Class (EN 1433) | Test load | Suits |
|---|---|---|
| A15 | 15 kN | Foot traffic only: patios, pool decks, paths |
| B125 | 125 kN | Cars and light vans. ACO's stated minimum for driveways |
| C250 | 250 kN | Heavier vehicles: ACO suggests it if trucks, RVs or delivery vans use the drive |
| D400 and up | 400 kN+ | Roads and commercial yards, not residential |
The rating assumes the specified concrete surround. A B125 grate on a plastic channel bedded in gravel isn't a B125 installation, and it's the channel that cracks, not the grate. Width is a sizing question: 4 inches suits most residential drives, and steep or wide drives may want 6–8 inches. The driveway page covers that choice.
Grate material tends to follow the class. Plastic grates are common at A15 and B125, while steel and ductile iron are more usual at C250 and above. Check the rating on the sheet rather than judging by material. Near patios and doors, a heel-resistant grate with narrow slots is kinder to shoes and small wheels. Whatever the class, fit the locking bars or bolts the system provides: an unlocked grate can lift under a turning tyre.
Tools and materials
Tools: a string line and level (or a laser), tape, marking paint, a concrete saw with a diamond blade (for a retrofit), a breaker or sledge, a shovel, a hand tamper or plate compactor, a trowel and edger, and a hacksaw for the pipe.
Materials: channel sections, end caps, an outlet adaptor (end or bottom), grates with their locking bars, 4-inch solid pipe and fittings, a cleanout, rebar or anchor stakes, compactable base stone, concrete (4,000 psi is the common specification), tape or covers for the grates during the pour, and expansion-joint filler and sealant.
How to install a channel drain, step by step
- Mark the line and the outlet end. Paint the channel line full width at the low point of the paving, edge to edge, and mark which end the outlet leaves from. That should be the end nearest the discharge route you measured.
- Call 811. Utility locating is free and required before digging in most states. Gas and electric lines to a garage often run under or beside the apron, so hand-dig near any marks.
- Set a string line at finished-surface level along the run, pinned beyond each end. Every later height is measured down from it, and the grate will sit ⅛–¼ inch below it.
- Saw-cut and break out, or form for a new pour. For a retrofit, cut two parallel lines the channel width plus about 4 inches each side, cut full slab depth, and break the strip out. Wet cutting keeps the silica dust down. For a new pour, form the channel strip before the slab.
- Excavate to the worksheet depth. Dig to the depth for the shallow end at one end and the low point at the other, then compact a few inches of granular base across the bottom. A soft spot here becomes a sunken channel later.
- Dry-fit the channels, end caps and outlet. Lay the sections in order, since pre-sloped systems are numbered. Fit the end cap and the outlet adaptor, then check the fall section by section and the grate height against the string.
- Set the channels on a concrete bed. Place the bed concrete, bed the sections into it and brace them with anchor stakes, rebar or the maker's installation brackets so they can't float or shift when the haunch goes in. Tape or cover the grates so no concrete gets into the slot.
- Pour the haunch to the surround dimension on both sides, at least 4 inches or the slab thickness if that's more. Work the concrete under the channel flanges and rod it so no voids are left against the channel walls.
- Finish the surface ⅛–¼ inch above the grate, tapered to the channel edge so water drops in rather than skating over. Keep the finish flat along the run; a hump beside the channel sends water sideways.
- Joints. Put transverse joints in the new concrete at the channel joints, and an isolation joint wherever the haunch meets an existing slab. Seal them once the concrete has cured.
- Connect and bury the outlet line. Glue or couple the solid pipe to the outlet adaptor and lay it to the discharge point at 1% or more. Check the fall every 10 feet before backfilling, and fit a cleanout.
- Cure, then test. ACO says to leave the bracing in place for 24 hours. Keep vehicles off until the concrete mix is ready for them, which is usually days, not hours. Then remove the grate covers, run a hose from the high end and watch that the water reaches the outlet steadily, with none standing in the channel.
Connecting the channel to a solid outlet line
An end outlet leaves through the end cap. A bottom outlet drops out of the underside, which is deeper but useful when the pipe must run straight down. A small catch basin box at the low end works as a sediment trap and an easy outlet connection; size a catch basin at the outlet end for the area it collects.
From there, run 4-inch solid pipe, never perforated, at 1% or more, with a cleanout. The pipe method is the same as for solid pipe to the outlet on a buried downspout line. End at daylight, a pop-up emitter, or a dry well where nothing is lower.
Don't tie the line into a French drain or a sanitary sewer, and check local rules before running it to a street or storm drain. Don't discharge concentrated water onto a neighbour's property.
Why channel drains fail, and how to avoid it
| Failure | What you see | How to avoid it |
|---|---|---|
| Channel stops short of the edges | Water runs round the ends to the door | Run it edge to edge, with end returns |
| Grate set flush or proud | Water skates over the slot; tyres catch the edge | Set the grate ⅛–¼ in below the surface |
| Unencased or soil-bedded channel | The channel cracks or sinks where wheels cross | Full concrete bed and haunch |
| No isolation joint | The slab cracks along the channel | An isolation joint against the old slab |
| Outlet too flat, or into a French drain or perforated pipe | Water backs up and sits in the channel | Solid pipe at 1% or more to a lower outlet |
| No cleanout or sediment point | The line silts and can't be cleared | A catch box or a cleanout at the outlet |
| Locking bars skipped | Grates rattle or pop out | Fit the locks the system provides |
| Wrong load class | Cracked grates or channel | Match the class to the heaviest vehicle |
Grates also need clearing of leaves and grit a few times a year. If one stops draining, see a blocked channel drain.
What it costs: doing it yourself or hiring it out
| Route | Per foot | A 20-ft apron |
|---|---|---|
| New pour, hired | $30–$80 | $600–$1,600 |
| New pour, DIY materials | $10–$25 | $200–$500 |
| Cut into existing concrete, hired | $70–$150 | $1,400–$3,000 |
| Outlet pipe beyond the drain, hired / DIY | $8–$15 / $2–$3.50 | $320–$600 / $80–$140 for 40 ft |
Planning estimates, not quotes. Slab removal, pavers, the outlet run and heavy grates move the number most. To estimate the whole job, use the cost calculator, and if you get bids, compare quotes line by line.
Related pages
- Driveway drainage: diagnosis, channel sizing and costs
- Patio and hardscape drainage
- Catch basins: for one low spot
- Clogged yard drain
- How much slope you need for drainage
FAQs
Do channel drains have to be set in concrete?
Anywhere a wheel crosses, yes: the load rating assumes the specified concrete bed and surround. Some plastic systems allow a compacted granular bed for foot-traffic-only runs such as patios, but only where the manufacturer's sheet says so.
How deep does a channel drain need to be?
The trench is the channel body plus about ⅛ inch of recess plus a 4-inch concrete bed, and it gets deeper toward the outlet by about ⅛ inch per foot. With a 5-inch channel, that's about 9 inches at the shallow end and about 11½ inches at the low end of a 20-foot run with an end outlet.
Do you need gravel under a channel drain?
You need a compacted granular base under the concrete bed. Gravel in place of the concrete isn't enough anywhere vehicles cross, and it's acceptable only for foot-traffic runs where the manufacturer allows it.
How much slope does a channel drain need?
Commonly about 1%, or ⅛ inch per foot. It's either built into pre-sloped sections or created by setting constant-depth sections on a fall. A centre outlet halves the fall needed along the channel. Check the manufacturer's figure for your system, since some specify more.
How is a trench drain connected to a pipe?
Through an end or bottom outlet adaptor into 4-inch solid pipe. The pipe keeps at least 1% fall to a pop-up emitter, daylight or a dry well, with a cleanout so it can be flushed. A small catch box at the low end makes the connection easier and traps grit.
How do you install a channel drain in existing concrete?
Saw-cut a strip the channel width plus about 4 inches each side, and break it out. Dig to the trench depth and compact a base, then set the channel on a concrete bed. Pour the haunch and fit isolation joints against the old slab. It typically costs about twice as much as setting one in a new pour.
What load class grate do I need for a driveway?
B125 is the usual minimum for cars under EN 1433, and it's ACO's stated minimum for driveways. Consider C250 if trucks, RVs or delivery vans use the drive. A15 is for foot traffic only. The rating holds only with the specified concrete surround.
How much does it cost to install a channel drain?
As planning estimates, about $30–$80 per foot hired in a new pour, and $70–$150 per foot cut into existing concrete. For a 20-foot apron that's roughly $600–$1,600 new or $1,400–$3,000 as a retrofit, plus the outlet run. DIY materials for a new pour run about $10–$25 per foot.
Sources consulted
- NDS — Channel Drain Installation: Step-by-Step Tips
- ACO Drain — Polymer Concrete Trench Drain Systems Site Installation Manual
- ACO UK — Drainage load class
- Hauraton — Load classes for drainage channels (EN 1433)
- BG-Graspointner — Trench drain installation guide
- StructureSmart — Channel drain installation
- Crafting with Concrete — Installing a trench drain in a concrete driveway
By Under Your Home Team · Last reviewed 2026-09-21